During the summer I experimented with making fabric flowers to embellish my Buttercup Bags. These flowers are easy to make and wonderful for a quick crafting fix. They also incorporate up cycled materials like bottle caps and scrap fabrics from old sewing projects or even old and unwearable clothes. To make these cute little creations all that is needed is a can of heavy starch (to prevent fabric fraying), 5or 6(your choice)- fabric squares (3x3 in. is an ideal cut), a bottle cap, heavy felt, pliers (to bend the bottle cap around the felt securing the fabric), a pin backing, hot glue, and lastly a needle and some thread. The first thing to do is cut the 3x3 fabric pieces. I use a cutting board and rotary cutter, but honestly the cuts do not have to be precise. A little unevenness gives the flowers a bit of whimsy.
 After all six of the fabric squares are cut fold them in half diagonally (place the top left corner down on the bottom right corner-I have forgotten the geometry terms) creating a triangle.
 After you have done this spay the fabric triangles with heavy starch and iron them into submission.
 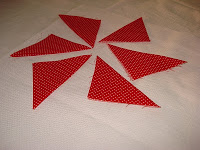 Next, use one long piece of thread and baste stitch the fabric triangles closed around the raw edges and together without cutting the thread. Basically, just string the fabric pieces together. There should be only one knot at the very beginning of the first petal to hold the petals onto the thread.
 Once the fabric pieces are strung, tighten the thread and bunch the petals up as tightly as possible. Tie the tread off at the beginning knot making sure that the petals remain tightly bunched. It will not look right as the point, but adjusting the petals will give you an idea of what the finished product will look like.
 The first thing to do is cut the 3x3 fabric pieces. I use a cutting board and rotary cutter, but honestly the cuts do not have to be precise. A little unevenness gives the flowers a bit of whimsy.
 After all six of the fabric squares are cut fold them in half diagonally (place the top left corner down on the bottom right corner-I have forgotten the geometry terms) creating a triangle.
 After you have done this spay the fabric triangles with heavy starch and iron them into submission.
  Next, use one long piece of thread and baste stitch the fabric triangles closed around the raw edges and together without cutting the thread. Basically, just string the fabric pieces together. There should be only one knot at the very beginning of the first petal to hold the petals onto the thread.
 Once the fabric pieces are strung, tighten the thread and bunch the petals up as tightly as possible. Tie the tread off at the beginning knot making sure that the petals remain tightly bunched. It will not look right as the point, but adjusting the petals will give you an idea of what the finished product will look like.
Now it is time to work on the center of the flower. This is where the recycling of bottle caps come into play. Cut a circle shaped piece of fabric 1/2 in. larger in diameter than the bottle cap. Cut a piece of felt the same diameter of the bottle cap. Put a dab of glue in the center of the bottle cap to secure the fabric, and then fold the fabric into the center. When all the fabric has been folded in, place a dab of clue on top of it and place the felt in the bottle cap to secure the fabric. The glue is optional. I find that I no longer need it, but when I first started making these it helped keep everything where it should be. Just experiment with this step and find what works best for you.

The next step is to use the pliers to bend the bottle cap edges in toward the center. This is how I secure that the fabric and felt stay in place. Be careful not to use too much force, so that the shape edges of the cap will not tear the fabric. 

This is an example of how far to fold the cap in. Do this in several different places around the edge.

Now it is time to assemble the whole piece. This is the trickiest part, but I do it the hard way. The easy way is to hot glue everything. Hot glue the pin backing onto the center bottle cap piece and then hot glue the bottle cap onto the petals. The hard way is to sew the pin backing onto the felt piece of the bottle cap with a curved needle. I also sew the bottle cap onto the petals going through the felt. Really, I suggest Hot Glue. I may start using it again, because it really does give better results. I just have a prejudice against hot gluing sewing projects. I am quickly beginning to reason that prejudice away!

CELEBRATE! Pin the pretty little flower on a purse, shirt, pair of jeans, bookbag or anything that needs to be made special. If you view my older posts you can see the fabric flowers on my Buttercup bags. HAPPY CRAFTIN'


1 comment:
Very cute!!
Post a Comment